Last Updated on by Vairo Kremanis

Have you ever noticed a date or category in a blog post? This is what’s called a ”post meta data” – an important part of a blog post. It helps in providing succinct meta data regarding your blog’s content pieces.
If used properly post meta can improve user experience; say a visitor is interested in a certain topic only, then category meta can help them short posts by category so they can view posts on that particular topic rather than see all the posts. Or, if you want to view posts of a particular author only, post meta can help you do that.
In this post, I’ll show you how to display and style post meta data.
What is Post Meta Data and How Can it Help my Blog?
The post meta data section contains relevant information of a blog post such as published date, author name, categories, tags and custom taxonomies etc.
If you have a blog then you should make sure your post’s meta data is spot on, as this information can help a visitor understand more about the post and it can also help to increase your page views by making your site easier for navigation.
How Much Post Meta Data Should you Display?
The post meta data location varies from theme to theme. Some may display it before the post title, some after the title and some right after the content.

But too many post meta pieces can mess up the layout. The ideal situation is one in which you would only display the information you feel is necessary.
Now let’s see how you can customize and add post meta.
Customizing Post Meta Data
As mentioned, the post meta location varies from theme to theme. Here we will work on a particular theme – in this case the default TwentySeventeen theme, so keep in mind that code and pages may be different from your theme.
In modern themes post meta are defined in template tags page and called in when required but in some themes you may find post meta is placed directly before or after the post title.
Generally, you would find post meta tags in index.php, single.php, archive.php and content template pages.
A simple code would look like this:
Posted on
<?php the_time('F jS, Y'); ?> by <?php the_author_posts_link(); ?> <?php edit_post_link(); ?>This code will display something like this Posted on date by author name with edit button (only if you are logged in the dashboard).
But now most modern themes are using template tags page to handle post meta. Let’s see how it works.
First, you would have to create a child theme before making any changes.
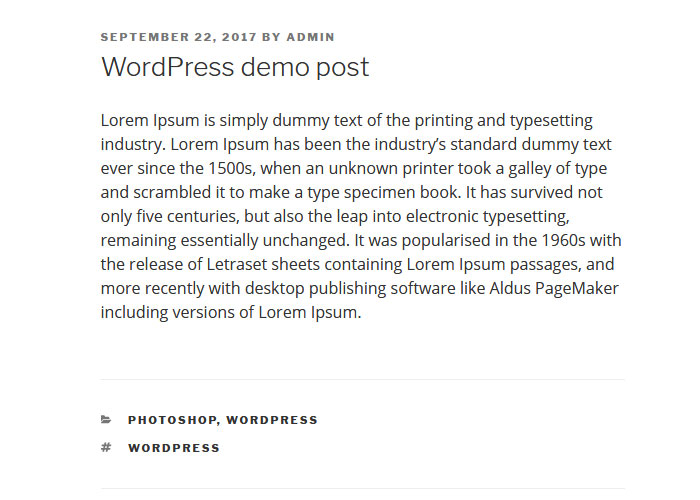
We will work on single post page and this is how it looks from the front-end.

Let’s say we want to add a user icon before the author name, to do that do the following:
In TwentySeventeen theme, single.php template is used to display single post. Now look for get_template_part and notice the template path there, in our case the path is:
get_template_part( 'template-parts/post/content', get_post_format() );
Now according to the path open content.php and search for entry-header section.
<header class="entry-header">

<?php

if ( 'post' === get_post_type() ) {

echo '<div class="entry-meta">';

if ( is_single() ) {

twentyseventeen_posted_on();

} else {

echo twentyseventeen_time_link();

twentyseventeen_edit_link();

};

echo '</div><!-- .entry-meta -->';

};


if ( is_single() ) {

the_title( '<h1 class="entry-title">', '</h1>' );

} elseif ( is_front_page() && is_home() ) {

the_title( '<h3 class="entry-title"><a href="' . esc_url( get_permalink() ) . '" rel="bookmark">', '</a></h3>' );

} else {

the_title( '<h2 class="entry-title"><a href="' . esc_url( get_permalink() ) . '" rel="bookmark">', '</a></h2>' );

}

?>

</header>

<!-- .entry-header -->
We can see twentyseventeen_posted_on(); function is called here to display the post meta, we have to edit this function. You will find this function in template-tags.php file.
A tip: check theme’s function.php file to get the file name and path.
Search for twentyseventeen_posted_on() and copy paste the entire function in your child theme’s function.php file (if you don’t have function.php file in your child theme then create a blank file with the same name).
We will use font awesome icons here, the simplest way to use font awesome in WordPress is by installing Better Font Awesome plugin.
if ( ! function_exists( 'twentyseventeen_posted_on' ) ) :

/**

* Prints HTML with meta information for the current post-date/time and author.

*/

function twentyseventeen_posted_on() {

// Get the author name; wrap it in a link.

$byline = sprintf(

/* translators: %s: post author */

__( 'by %s', 'twentyseventeen' ),

'<span class="author vcard"><a class="url fn n" href="' . esc_url( get_author_posts_url( get_the_author_meta( 'ID' ) ) ) . '"><i class="fa fa-user" aria-hidden="true"></i>' . get_the_author() . '</a></span>'

);

// Finally, let's write all of this to the page.

echo '<span class="posted-on">' . twentyseventeen_time_link() . '</span><span class="byline"> ' . $byline . '</span>';

}

endif;
Now you can see a user icon beside the author name.
A tip: you can make these changes directly in the content.php file but it is a good practice to follow the theme structure.
Adding Post Meta Data
So far we have customized existing meta tags. Now to spruce things up – let’s assume we want to display category and tags after the post title.
To do this, copy the content.php file from the parent theme and paste it in your child theme, keeping the same directory pattern.
twentyseventeen > template-parts > post > content.php to twentyseventeen-child > template-parts > post > content.php
Now you have to write a new function.
Think it’s tough? Actually it’s not, here’s what you need to do.
Most themes will show category and tags somewhere in the post, you just need to locate the file and replicate the code in your function that’s it.
In our instance, in TwentySeventeen theme category and tags are placed after the content. Now we need to follow our previous workflow.
Open content.php and see which function is used for category and tags.
<?php

if ( is_single() ) {

twentyseventeen_entry_footer();

}

?>

Here it is twentyseventeen_entry_footer().

Now go the template-tags.php file and search for twentyseventeen_entry_footer().

if ( ! function_exists( 'twentyseventeen_entry_footer' ) ) :

/**

* Prints HTML with meta information for the categories, tags and comments.

*/

function twentyseventeen_entry_footer() {


/* translators: used between list items, there is a space after the comma */

$separate_meta = __( ', ', 'twentyseventeen' );


// Get Categories for posts.

$categories_list = get_the_category_list( $separate_meta );


// Get Tags for posts.

$tags_list = get_the_tag_list( '', $separate_meta );


// We don't want to output .entry-footer if it will be empty, so make sure its not.

if ( ( ( twentyseventeen_categorized_blog() && $categories_list ) || $tags_list ) || get_edit_post_link() ) {


echo '<footer class="entry-footer">';


if ( 'post' === get_post_type() ) {

if ( ( $categories_list && twentyseventeen_categorized_blog() ) || $tags_list ) {

echo '<span class="cat-tags-links">';


// Make sure there's more than one category before displaying.

if ( $categories_list && twentyseventeen_categorized_blog() ) {

echo '<span class="cat-links">' . twentyseventeen_get_svg( array( 'icon' => 'folder-open' ) ) . '<span class="screen-reader-text">' . __( 'Categories', 'twentyseventeen' ) . '</span>' . $categories_list . '</span>';

}


if ( $tags_list ) {

echo '<span class="tags-links">' . twentyseventeen_get_svg( array( 'icon' => 'hashtag' ) ) . '<span class="screen-reader-text">' . __( 'Tags', 'twentyseventeen' ) . '</span>' . $tags_list . '</span>';

}


echo '</span>';

}

}


twentyseventeen_edit_link();


echo '</footer> <!-- .entry-footer -->';

}

}

endif;

Find the code for category and tags then copy and paste the code in your child theme's function.php file within a new function, like this -

if ( ! function_exists( 'twentyseventeen_post_meta' ) ) :

/**

* Prints HTML with meta information for the current post-date/time and author.

*/

function twentyseventeen_post_meta() {

/* translators: used between list items, there is a space after the comma */

$separate_meta = __( ', ', 'twentyseventeen' );

// Get Categories for posts.

$categories_list = get_the_category_list( $separate_meta );

// Get Tags for posts.

$tags_list = get_the_tag_list( '', $separate_meta );

echo '<span class="cat-tags-links">';

// Make sure there's more than one category before displaying.

if ( $categories_list && twentyseventeen_categorized_blog() ) {

echo '<span class="cat-links"><i class="fa fa-folder-open" aria-hidden="true"></i><span class="screen-reader-text">' . __( 'Categories', 'twentyseventeen' ) . '</span>' . $categories_list . '</span>';

}

if ( $tags_list ) {

echo '<span class="tags-links"><i class="fa fa-tags" aria-hidden="true"></i><span class="screen-reader-text">' . __( 'Tags', 'twentyseventeen' ) . '</span>' . $tags_list . '</span>';

}

echo '</span>';

};

endif;
You can see I have used font awesome icons for both categories and tags.
Styling your Post Meta
Since we have placed our meta tags in our desired location, it’s time to adjust some style.
It’s very straightforward if you know basics of CSS. Let’s adjust our category and tags section.
.entry-header .cat-tags-links {

font-size: 14px;

}

.entry-header .cat-links {

padding-right: 5px;

}

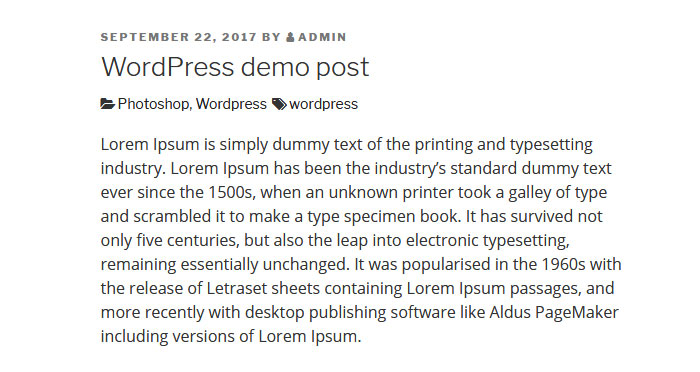
Now it looks different.
But if you want to show your own custom icon instead of font awesome or any other, then you can use your image as background image in CSS like this:
.entry-header .cat-links {

background: url(category-img.jpg) left center no-repeat;

padding-left: 5px;

padding-right: 5px;

}

.entry-header .tags-links {

background: url(tag-img.jpg) left center no-repeat;

padding-left: 5px;

padding-right: 5px;

}
Once done don’t forget to remove font awesome code from your function.php file.
Remove Any Post Meta
Removing any post meta is very simple, just find the code and delete it.

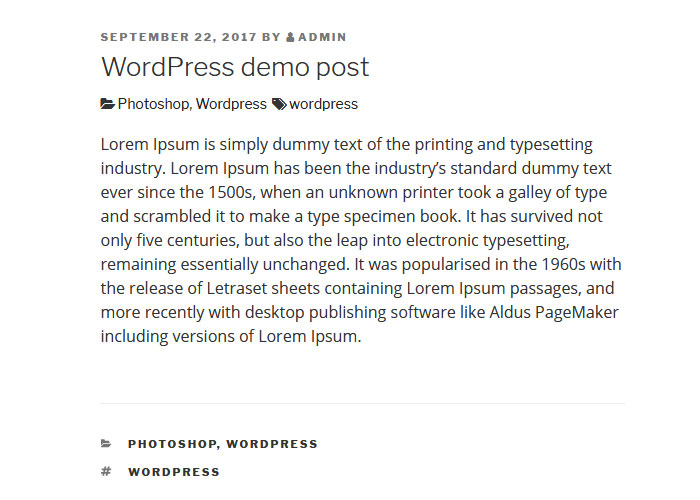
For example, if you see our single post page now the categories and tags are now appearing in two sections. If you don’t want to display it after the content, then simply delete the category and the tag code from twentyseventeen_entry_footer() function.
So the new code would look like this in your child theme.
if ( ! function_exists( 'twentyseventeen_entry_footer' ) ) :

/**

* Prints HTML with meta information for the categories, tags and comments.

*/

function twentyseventeen_entry_footer() {

// We don't want to output .entry-footer if it will be empty, so make sure its not.

if ( get_edit_post_link() ) {

echo '<footer class="entry-footer">';

twentyseventeen_edit_link();

echo '</footer> <!-- .entry-footer -->';

}

}

endif;
Conclusion
As you can see post meta data can be displayed in many ways, but it’s best if you acquire a basic understanding of your theme structure first and only then if possible make adjustment accordingly. This minimizes the possibility of your theme breaking down. P.S. don’t forget to create a backup.
I hope this post has helped you to understand how post meta data works, but if you have any relevant questions do post your comments below.


Thumbs up on this, Vairo.
This is something every web developer and website owner needs to read.
Although am a web and mobile developer, I actually learned something to add to my coding bag now.
Thanks, once again.
I’m pleased to hear that you found it useful Osho.
Dear Vairo,
I just want to say “Thank you so much”.
I’ve struggled to change the Publish Date to the Updated Date of the post.
get_the_modified_date()
I don’t know how to modify it with the Modern Theme, the link is so complicated (with Inc, template.php). Normally I can find it in single.php, but wih the Modern Theme, single.php is too short, with no informaton.
Finally, with your article, I managed to do it. thank you
I’m glad that you sorted it!
Hi Vairo! How can I make the post meta show the Last Updated date (if a post was updated) instead of the Publish Date in the TwentySeventeen theme? I’ve tried changing some code in the template-tag.php but it doesn’t seem to work. Any help will be highly appreciated! Thanks!
Hy Lryna! You can use the Last Modified Plugin to achieve this.
I kinda understand this. Right now my site uses date | category beneath the post title and tags in boxes under the post content. I only want to show date and tags (no categories) how can I do this? So I want the output to be October 11, 2013 | TAGS: Summer, Fashion (like that) I’ve searched everywhere on the web trying to figure this out and I’m ready to pull out my hair.
hello I’m still learning and really appreciate your tutorial but I’m stuck with one little detail for you I’m sure but for a big one
now I got
article title
date and author name ( same line)
category
tag
but I got a huge gap between article/title/date/author GAP GAP category tag it’s not display like your example.
Hope you can help me to understand this
sorry disturb you I found the problem
just a css
next move display the modified date